❮ All Topics | English | Deutsch | Chinese
RDX to FR7 Integration Setup
Full FR7 Setup Guide
[!] These instructions are for RDX firmware labelled
VISCA VC.0.6. If your version is different, please contact NODO support. To check the version, connect the RDX and check the Inertia Wheels dashboard for the version number.
Overview
[$] Check all of these points if the system is not communicating.
The setup requires these key components:
- The FR7 is connected to the same Ethernet network as the RDX, or directly to the RDX with an Ethernet cable.
- The FR7 has a known wired LAN IP address.
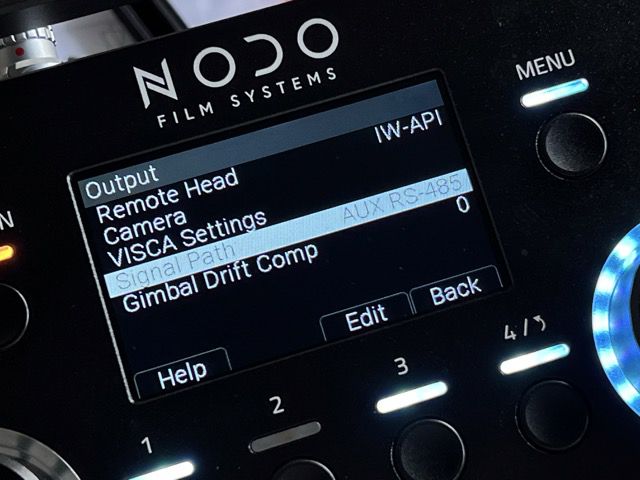
- The Inertia Wheels output is set to
IW-API. - The Inertia Wheels signal path is set to
AUX RS-485. - The RDX is connected to the Inertia Wheels through the
AUXport. - The RDX network mode and IP settings are configured for the production network.
- The RDX target camera IP is set to the FR7 wired LAN IP address.
- The dashboard has been configured with the user buttons and knobs to control the FR7.
- Once everything else is complete, the
Initabutton is pressed to initialize the head.
Setup FR7
Set the wired LAN IP address of the FR7 to the address you want the RDX to control. A common example is 192.168.0.20.
- Connect the FR7 to a network via Ethernet cable
- Access the FR7 web app
- Change the Wired LAN settings
- DHCP: Off, if using a manual camera IP
- IP address: the camera IP you want to control, such as
192.168.0.20
[i] In
VC.0.6, the target camera IP is editable from the Inertia Wheels menu. The camera no longer has to use one fixed RDX firmware IP address.
Setup Inertia Wheels Communication Path
Configure the wheels to communicate with the RDX over the AUX cable.
Menu / Output / Remote Head: IW-API
Menu / Output / Signal Path: AUX RS-485
Physical Connection
RDX To FR7
Use an Ethernet cable from the RDX to the FR7, either directly or through the production network.
[i] For DHCP networks, connect Ethernet before powering the RDX so it can request an address during boot.
Inertia Wheels To RDX
Use the AUX cable to connect the AUX port on the Inertia Wheels to the port on the RDX.
[!] Before plugging in, look carefully at the port location. Do not force the connector into the
Third Axisport by mistake.
Setup Inertia Wheels Dashboard
[!] These settings will only appear after the wheels are communicating with a powered RDX.
Use these settings to enable full control over the FR7 from the dashboard.
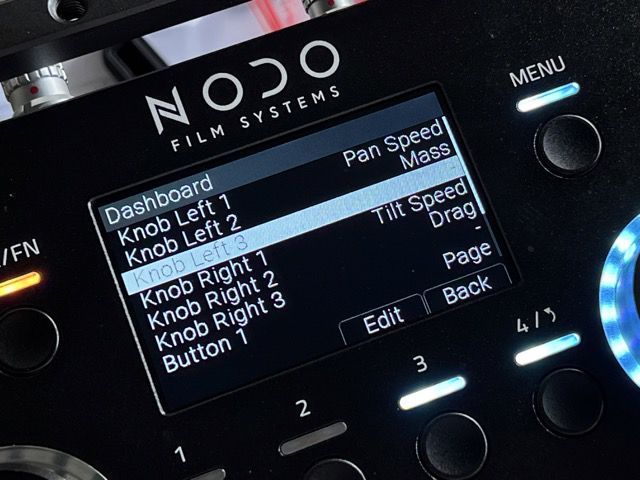
In Menu / Dashboard, set:
- Knob Left 1:
P. Speed - Knob Left 2:
Mass - Knob Left 3:
VISCA Settings > -- Select the first
-entry listed.
- Select the first
- Knob Right 1:
T. Speed - Knob Right 2:
Mass - Knob Right 3:
VISCA Settings > -- Select the second
-entry listed.
- Select the second
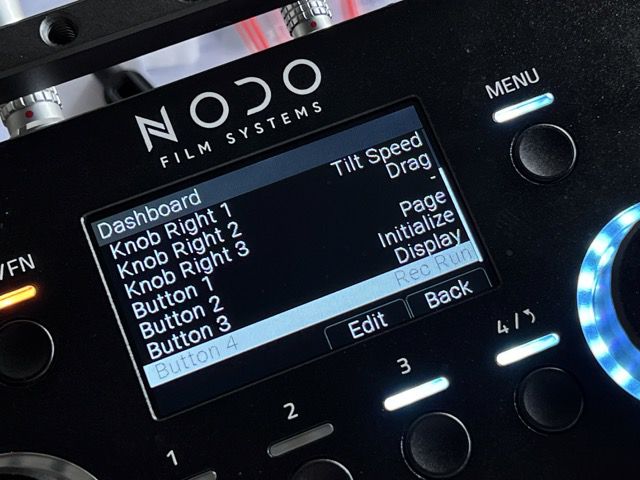
- Button 1:
VISCA Settings > Page - Button 2:
VISCA Settings > Initialize - Button 3:
VISCA Settings > Display - Button 4:
VISCA Settings > Record Run
Configure RDX And Camera IP Settings
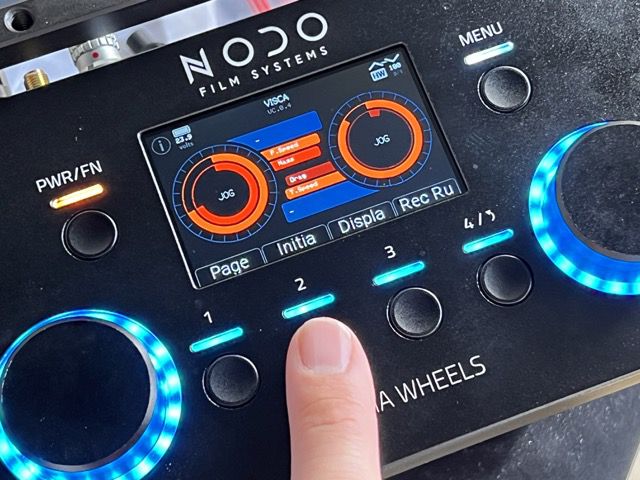
When the RDX boots, it should show VISCA Settings in Menu > Output. The VISCA Settings pages include a Network page for configuring the RDX and camera IP settings.
Network Page Controls
On the Network page:
- Button 1:
Page - Button 2:
Camera/RDX - Button 3:
DHCP/StaticwhenRDXis selected - Button 4:
Apply - Knob 1: selects IP octet
1-4when IP editing is available - Knob 2: sets the selected octet value
0-255when IP editing is available
Camera means the target VISCA camera IP.
RDX means the RDX network IP.
When RDX is set to DHCP, the status line shows the active RDX IP address once Ethernet is up. If DHCP has been selected but not applied yet, the status line shows DHCP APPLY. The IP edit knobs are disabled.
When RDX is set to Static, the status line shows the saved manual IP and the edit knobs are enabled.
When Camera is selected, the DHCP/static selection is hidden and the edit knobs set the target VISCA camera IP.
Apply Indicator
When a network setting has been changed but Apply has not been pressed, the API name changes from VISCA to IP EDIT and the status level changes to attention.
If you leave the Network page with unapplied network changes, the API name changes to IP NA and the status level changes to error.
Pressing Apply restarts the RDX and returns the API name/status level to normal on boot.
Set The RDX To DHCP
- Press
Pageuntil theNetworkpage is shown. - Press Button 2 until the target shows
RDX. - Press Button 3 until the mode shows
DHCP. - Press Button 4,
Apply, to restart the RDX.
In DHCP mode, the RDX tries DHCP first. If DHCP fails, it falls back to the saved RDX static IP.
Set The RDX To Manual IP
- Press
Pageuntil theNetworkpage is shown. - Press Button 2 until the target shows
RDX. - Press Button 3 until the mode shows
Static. - Use Knob 1 to select octet
1,2,3, or4. - Use Knob 2 to set that octet value.
- Repeat for all four octets.
- Press Button 4,
Apply, to restart the RDX.
RDX IP and DHCP/static mode are saved immediately. Apply restarts the RDX so the saved network settings become active.
Set The Camera IP
- Press
Pageuntil theNetworkpage is shown. - Press Button 2 until the target shows
Camera. - Use Knob 1 to select octet
1,2,3, or4. - Use Knob 2 to set that octet value.
- Repeat for all four octets until the displayed IP matches the FR7 wired LAN IP address.
- Press Button 4,
Apply, to restart the RDX.
Camera IP changes are saved immediately and apply live to outgoing VISCA-over-IP packets. Pressing Apply is still recommended so the RDX reboots into a clean applied state.
[i] If a dotted IP is too long for the status line, the display removes the first separator. For example,
192.168.100.100is shown as192168.100.100.
Final Setup
Once the IP addresses are configured and the RDX has rebooted, press the Inita button, short for Initialize, to initialize the connection to the head properly.
[!] The FR7 will not respond unless everything has been configured properly and the Initialize button has been pressed.
This links the wheels to the head, configures the head to use a wider range of speed settings, and configures the camera to respond to the dashboard controls properly.
[!] If control is ever lost on the head, try the
Initabutton first. It will also reset the VISCA packet identifiers if the FR7 starts ignoring packets.
Controlling The FR7
Use the Page button to move through different VISCA settings.